| Introduction | Editing Text | Images | Links | Page Properties | Tables |
Editing Text with Contribute
As we left the first page of the tutorial, we had just clicked on the Edit Page button. After a few intervening screens (as Contribute creates a dynamic version of the page), we now see our web page with a new set of tools for our text editing pleasure.
 NOTE WELL : NOTE WELL : The text editing tools are visible as long as the cursor is placed in a text area. If you should click on an image (for example), the tools will change to image editing. Just click on a text area to reactivate the text editing tools. |

- Publish
- When you have completed all of your edits, click on this button
to upload the edited page to the server. This means it will now
be visible to "the whole world," so be sure the page is exactly what
you want before publishing.
NOTE: the screen returns to the "regular" mode after Contribute publishes your changes. To make additional changes, you must click on Edit Page again. - Send for Review
- If you are working with other instructors on this site, this option
allows you to share your edits with them before making them public.
Contribute creates a temporary folder on the server to allow others
to read and edit it before it goes online.

- Save for Later
- 1. Saves your page.
2. Notifies you that it is in unpublished draft form by adding a notation to the page:

3. Lists your draft in the upper left Contribute frame:
4. Returns you to Edit mode when you click on unpublished draft. - Discard Draft
- Cancels the unsaved edits you've made to that point. This can be very useful. It allows you to "play around" with Contribute without the risk of totally ruining your page. It is also possible to delete an unpublished draft with Discard Draft. If you wish to remove it from your list, shown above, click on the title in the list, then click on Discard Draft to remove it from the screen and the list.
- Link
- Creates a link. More about this later.
- Image
- Inserts an image. More about this later.
- Table
- Inserts and formats a table. More about this later.
The second row of icons should look very familiar: they are identical in appearance and function to those in Microsoft Word. To be charitable, however, here is a short review.
| Styles | 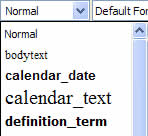 You
may be aware of style sheets in web page design. If they have been
used on your document, they will be listed here. Click on Normal
to see a drop-down menu of formats. It is also possible to create
new styles. Contribute will keep track of all of the formats you
create. You
may be aware of style sheets in web page design. If they have been
used on your document, they will be listed here. Click on Normal
to see a drop-down menu of formats. It is also possible to create
new styles. Contribute will keep track of all of the formats you
create. |
|
| Fonts | Although you may add font faces to this dropdown list, keep in mind that the reader's computer must have that font installed for it to appear as you have indicated. | |
| Size | Sizes are listed exactly as you find them in Word. The smaller the number, the smaller the text. | |
| Bold/ Italics |
Highlight the text you want to format, then click on the B or the I -- or both. | |
| Alignment | In order: Left, Center, Right, Justify (spread evenly across the available space -- don't use this). | |
| Lists | Ordered (numbers) and Unordered (bullets) | |
| Outdent/ Indent |
Use these buttons to demote or promote text, to move to a lower or higher level of a list, to do blockquotes, etc. | |
| Color | Font color, left, and fill color, right. We'll discuss fill color when we talk about tables. |
There is one button left -- ![]() --
Page Properties. It is located in
the top row of buttons, to the right of Tables.
Page Properties can be used to format text, but because it serves many functions,
it has its own page in this tutorial. We'll
simply list here the four categories included in these properties: Title/Encoding, Appearance,
Links, and Headings.
Page Properties also change to reflect the object being formatted, such
as images.
--
Page Properties. It is located in
the top row of buttons, to the right of Tables.
Page Properties can be used to format text, but because it serves many functions,
it has its own page in this tutorial. We'll
simply list here the four categories included in these properties: Title/Encoding, Appearance,
Links, and Headings.
Page Properties also change to reflect the object being formatted, such
as images.
The following issues may come up as you work with your pages.
- Inserting, changing, or deleting text
- Editing in Contribute is very similar to editing in Word. To insert
text, place the cursor at the insert point and start typing. To change
text, highlight the material to be edited and either Delete or simply
start typing the new content. To delete text, highlight it, and hit
Delete or Backspace.
TIP:
Of course you know that you can double-click to select (highlight) a word and triple-click to select a paragraph. You do know that, right?
- Using Copy & Paste in Contribute
- When you wish to add large blocks of text, it may be preferable to use Copy & Paste.
The text to be copied may come from Word, Note Pad, another web page,
another area of Contribute, etc. In other words, Control+C (Copy)
and Control+V (Paste) work here just
as they do in other programs.
TIP:
Of course you know that you can Undo your typing with the Control+Z keys. As long as you haven't clicked on Publish or Save for Later, you can undo any error (and multiple errors if you keep entering Control+Z) -- just like Word. You do know that, right?In Mac, it's Command+Z.
- Changing the font face, size, or color of the text
- Font Face — Highlight the text you wish to edit. Click on the font window
to select the desired appearance. Your choices are the standard fonts
for the Web (shown here in their respective faces): Arial, Courier
New, Geneva,
Georgia, Times New
Roman (the default font), and Verdana.
The basic rule is, use a serif font (Times New Roman or Georgia) for
the paragraphs of your page, and reserve sans-serif fonts (Arial, Geneva,
and Verdana) for headings. Courier New is
 rarely used
(please keep it that way).
rarely used
(please keep it that way).
Font Size — Follow the same steps of selecting the text and clicking on the menu to change size. The numbers are standard sizes in Word, ranging from 12 to 72 points.
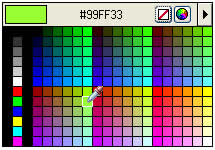
Font Color — The text color icon -- --
works the same way. Select the text to be changed, then click on the
text color button to reveal the color palette shown to the right. Your
cursor will turn into an eyedropper, allowing you to select the desired
color. It also lets you sample colors from your web page, so that if
you want to copy a color used in a graphic, just move the eyedropper
over the color, and you'll "capture" it for your text.
--
works the same way. Select the text to be changed, then click on the
text color button to reveal the color palette shown to the right. Your
cursor will turn into an eyedropper, allowing you to select the desired
color. It also lets you sample colors from your web page, so that if
you want to copy a color used in a graphic, just move the eyedropper
over the color, and you'll "capture" it for your text.
Font Weight and Decoration — Bold and italics can be applied to text either through the "button" in the editing bar or with Control+B (bold) and Control+I (italics). Don't overuse italics; it is quite difficult to read unless it is also bold (which I recommend). It's also possible to underline text with Control+U, but don't -- it might be mistaken for a link, and that will irritate your readers.
- Changing the alignment of text
- To align a paragraph or heading, simply click anywhere in it, then
click
 on
the desired alignment icon. NOTE: Rarely is
it appropriate to center text on a web page. Please remember this as
you are tempted to center a paragraph. Titles and headings may be centered,
but not large sections of text (more than three lines) without a very
good reason (other
than "I like it that way").
on
the desired alignment icon. NOTE: Rarely is
it appropriate to center text on a web page. Please remember this as
you are tempted to center a paragraph. Titles and headings may be centered,
but not large sections of text (more than three lines) without a very
good reason (other
than "I like it that way"). - Checking your Spelling
- Good news! Contribute CS4 has a spell checker! If you look carefully, it underlines misspelled words (and words it doesn't recognize) with a dotted red line. You'll still have to use the F7 key or the Format --> Check Spelling... option to see suggested spellings. And you have the spell check icon to click on --
 . Do this often!
- Adding to, editing, changing the style of, or deleting lists and list items
- Contribute gives you two kinds of lists to use, but with a little
digging you'll find that you can format all kinds of lists quite easily,
including unordered (bulleted), ordered (numbered or lettered),
and definition list (this section of the tutorial is a definition list,
with the term on the margin and the definition indented).
Adding to a List — Place your cursor at the end of the item preceding the new item. Hit Enter. A new number or bullet will appear, ready for you to type in the text, and all of the exiting numbers (or letters) will reformat automatically to reflect the new order. To delete, highlight the list item and hit Delete or Backspace -- or place the cursor at the end of the item and hit Backspace until the list item is gone.
Changing the Style of the List — To go from bullets to numbers or vice versa, simply click on the first list item, then click on the desired format button — .
.
 Changing
the style of the bullet or from numbers to letters involves only a little
more work.
Changing
the style of the bullet or from numbers to letters involves only a little
more work.
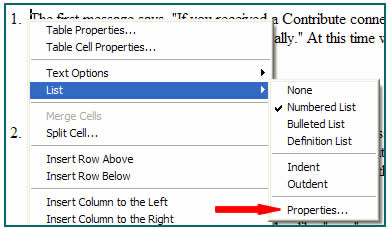
1. Right-click (Control+click in Mac) on the list item. A drop-down menu shows your options. Note that the list is currently a Numbered List. To change, simply click on the preferred list format.
2. At the bottom of the illustration to the right you'll see Properties... (note the red arrow). Click on this to find more detailed ways to edit your list. For example, you wish to use letters instead of numbers, or you may wish to use a square rather than a round bullet.
- Applying a Style to text
- When your site was created, it's very likely that the designer
used a style sheet to keep layout and appearance consistent from page
to page. A style is a set of characteristics, such as font face, size,
color, weight, etc. A typical style sheet entry (actually used on this
site) looks like this:
.definition_term {
font-family: Verdana, Arial, Helvetica, sans-serif;
font-weight: bold;
font-size: 12px;
}
All of the styles in the connected site's style sheet are available for you to use as you edit your pages. Click on Style for a drop-down menu of style names and appearances. To apply the style, highlight the text you wish to format (a word or a line) or simply place the cursor anywhere in the paragraph, and then click on Style to select the desired style from the menu.
 View
this short tutorial to see how to apply a style.
View
this short tutorial to see how to apply a style.
- Creating blockquotes and other uses of indentation
- A blockquote can be used, as it is in research papers, to indicate
a quotation of four or more lines. However, it has many uses for the
web page builder. It is really like the Tab key, with one major difference:
it indents from both the left and right margins. You
can click on the indent button several times if you like, but the amount
of text you can have in the line gets smaller and smaller. NOTE:
Individual lines of text, within a paragraph,
cannot be formatted with the indent and outdent buttons. It will affect
the entire paragraph. Another use of the indent button is to move a
list item to a subordinate level. Contribute automatically changes
the appearance of the bullet, number, or letter to reflect the subordination.
To return to a higher level, use the outdent button --
 .
.
| TIP: Contribute acts very much like a word processor when it comes to entering text. But did you know that you can Copy & Paste from Word directly into Contribute? It's true! So, for example, you have to transfer the school newsletter to the Web page -- just do a Copy & Paste from Word, then use Contribute's formatting tools to make it look like the rest of the text on the page. Very handy! |
Creating a New Page in Contribute
You may recall that one of the buttons on Contribute's opening screen (after you have logged into a site) was called New... Clicking on this button allows you to add pages to the site.

You will now see several options -- the number will be determined by the number of sites you have currently connected on Contribute. You'll see from the illustration below that I have four listed.

If necessary, select the site for which you are creating the new page. In each case, your options will be the same as those shown above: Blank Web Page, Copy of Current Page, Starter Web Pages (there are lots of "models" to choose from, but the new page should resemble the existing pages on the site, so don't get too exotic), and Templates (that already exist in the site's remote file. You'll note that I have no templates for Contribute.).
We have two options. Which one is more likely to lead to good web site design:
- Choose Blank Web Page
- Choose Copy of Current Page.
If you chose Copy of Current Page, treat yourself to your favorite beverage. You remembered my caveat about Starter Web Pages -- "...the new page should resemble the existing pages on the site." By using a copy of an existing page, you're much more likely to follow the same layout, styles, etc., as those of the current site -- and that's a very good thing to do!
Here are the steps to turning that Copy of Current Page into a new page for your site.
- Click on Copy of Current Page (a preview of the page will appear in the Preview: window).
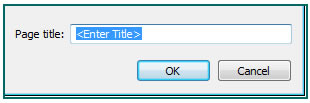
- Type in the title of the new page in the lower right hand corner of the New Page dialog window, and hit Enter or click on OK. NOTE: the Title is not the same as a file name, like new_page.html. It is simply the title, like Contribute Tutorials - Editing Text, that appears in the Web browser's Title bar at the top of the page.
- Contribute now generates a copy of the selected page that you can edit into a "new" page. All of the page is editable, and everything can be deleted if desired. To delete text, highlight the text and hit Delete, Backspace, or Control + X. To delete an image, click on the image to select it and hit Delete, Backspace, or Control + X. Any styles attached to the page will be untouched by these deletions (that's good, because you'll want to use them as you add the new contents).
- Enter text through the keyboard, Copy & Paste, or any other method you would use in Word.
- Format the text using styles available through the formatting tools (see the section on Style, above).
- Add images as needed (that section of this tutorial is on the next page).
- If your new page is done (or you simply have to stop working on it for the time being) you have another choice to make now. Here are your options:

- Publish uploads the file to the server, allowing it to be seen on the Internet by others.
- Send for Review allows you to save the page where only the person you want to review it can see it.
- Save for Later simply saves the page to your computer, but it does not upload it to the remote server. NOTE: once you Save the page, it is no longer editable -- unless you click on Edit Page again.
- Cancel erases the whole megillah.
When you click on Publish, the following dialog window opens:
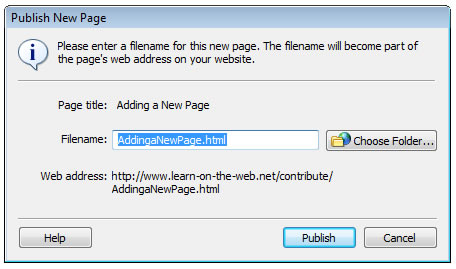
Note that you must do three things to complete the Publish process:
- Accept or replace the Filename which Contribute created, based on the page title. Keep in mind that there must be no spaces in the file name; use underlines or dashes instead.
- Click on Choose Folder... to save the file in the same folder as the site on which you are working.
- Click on Publish or hit Enter.
| TIP: If your goal is to replace an old page with your new page, use the name of the old page when you save the new page. This will cause Contribute to overwrite the old page. |
Here are the steps needed to start your new page with Blank Web Page.
- Click on Blank Web Page; then type in the Title of your new page.
- Hit Enter or click on OK. You will now see a completely blank page, unformatted in any way and unattached to any style sheets. Any styles that you create on the page will be limited to that page alone.
- Use the formatting tools to enter text, align it, indent it, create lists, etc., just as you would in Microsoft Word. It is also possible to Copy & Paste directly from a Word document as needed or from another Web page.
- Add images as needed (that section of this tutorial is on the next page).
- Save the page. Refer to item #7 above for saving options.
| VERY IMPORTANT: If you have created a truly new page, don't forget to link it to your site. Until you do, no one will be able to link to it unless they have its address (URL). |
When you're ready, move on to Images.
| Introduction | Editing Text | Images | Links | Page Properties | Tables |
Last Updated: February 11, 2010