| Introduction | Editing Text | Images | Links | Page Properties | Tables |
Working with Images in Contribute
Like text, editing the images on your site starts with clicking on the Edit Page button in the opening screen. After a brief transition period, the editable page opens with the tool bar shown below. Notice that Image has been circled in red for emphasis.
 TIP: TIP: Remember that as you work with images in Contribute, you are not editing the images themselves. You're simply adjusting their placement and size. Further, although you're able to reduce their size on the browser screen, the actual image file remains the same, both in dimensions and file size (bytes). |

Clicking on the Image button reveals a drop-down menu with three choices: From My Computer..., meaning that the file you wish to access is located in a folder on the computer you are using with Contribute; From Website..., meaning that you wish to link to an external folder (from one of the web sites to which you are connected) to retrieve the image; and From Shared Assets..., an option we will not utilize.
Adding an image from your computer
You decide that the page requires another illustration, so you need to add an image:
- You've already selected Edit Page, so you can now click on the Image button and select From My Computer...
- A navigation window will open, showing you the files on your computer.
- Navigate to the desired folder and image, then click on Select.
- The image now appears on the web page.
Now that you have a new image on the page, you also have a new set of tools.
![]()
NOTE: It is necessary to click on an image to activate any of these tools, so your first step is always to click on the image with which you're working.
The explanations that follow are meant to be more description than instructions for use. Detailed instructions and suggestions of how these tools might be used follow this chart.
| Resize |  Click
on the icon, then click on the image. Handles (the blue squares)
will appear. Move your cursor over the right handle to change the
horizontal dimension. Move the cursor over the bottom handle to change
the vertical dimension. Move your cursor over the corner handle to
change both dimensions
in the same proportion. Click
on the icon, then click on the image. Handles (the blue squares)
will appear. Move your cursor over the right handle to change the
horizontal dimension. Move the cursor over the bottom handle to change
the vertical dimension. Move your cursor over the corner handle to
change both dimensions
in the same proportion.
|
|
| Rotate | Click on the left button to rotate the
image counter-clockwise. Click on the right button to rotate the
image clockwise.
|
|
| Crop |  To
crop an image means to cut away parts of it that you don't want.
For example, there may be two people in a photo, but you only want
to show one of them. Click on the image to be cropped, then click
on the Crop tool. Handles will
appear, as shown in the image here. Move each handle as needed; the
area inside the dotted lines is what you will keep. When you have
the image defined correctly, hit Enter. To
crop an image means to cut away parts of it that you don't want.
For example, there may be two people in a photo, but you only want
to show one of them. Click on the image to be cropped, then click
on the Crop tool. Handles will
appear, as shown in the image here. Move each handle as needed; the
area inside the dotted lines is what you will keep. When you have
the image defined correctly, hit Enter.
|
|
| Sharpen | 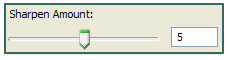 If
the image seems blurry, click on this button to reveal a dialog window,
a small portion of which is shown here. Click on the slider and move
to the desired level of sharp. If you have checked the Preview box,
the image on the screen will display the sharpness you have chosen.
When you are satisfied, click OK. If
the image seems blurry, click on this button to reveal a dialog window,
a small portion of which is shown here. Click on the slider and move
to the desired level of sharp. If you have checked the Preview box,
the image on the screen will display the sharpness you have chosen.
When you are satisfied, click OK.
|
|
| Brightness/ Contrast |
Click on the icon to reveal two sliders,
Brightness and Contrast. Be sure the Preview box is checked to see
the effect of your changes.
More detailed directions can be found here.
|
|
| Dimensions | Highlight either number to change the
dimension; both numbers will change proportionately. NOTE: generally
it is safe to reduce the size of an image.
Rarely is it a good idea to increase the size of an image, due to
pixelation.
|
|
| Alignment | Use these buttons to align the image
on the page, but only in a general way. To achieve text wrap, where
the text fills in around the image (as it does for the illustration
for Sharpen above), you must use Properties.
|
|
| Properties | This is not the same set of properties
that we mentioned earlier; you may notice a picture of a tree behind
the little wrench. Briefly, here are its functions:
|
| TIP: Just in case you missed the admonition above, try this: It is better to reduce than to enlarge. In other words, reducing the size of images using Contribute isn't ideal (it's better to use an image editing program), but it looks reasonably good. However, significantly enlarging images makes them look really bad. |
Some applications of the image tools
- Cropping for emphasis
-
Cropping allows you to cut away portions of an image which don't "say" what you need to say. Consider the two images below.
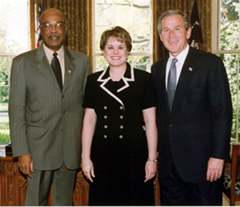
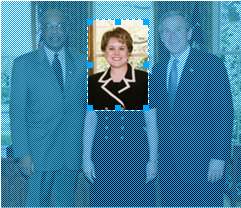
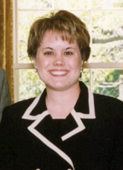 The
image to the left (above) is fine, but if you want
a photo of the young woman, you have a lot of unneeded material on
either side of her. Cropping puts the focus on her, where it belongs.
The
image to the left (above) is fine, but if you want
a photo of the young woman, you have a lot of unneeded material on
either side of her. Cropping puts the focus on her, where it belongs.
NOTE: In this case, cropping would be a mistake because it changes the photo's "story" dramatically. Cropping a photo can make the photo very misleading if done incorrectly. And no, I didn't "steal" this photo from a White House web page. That's my daughter.
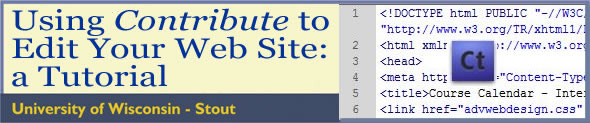
| TIP: One place where cropping is a vital tool in my teaching is the creation of all the screen shots I include in my courses. Mac users have the Command +Shift+4 key combination that allows them to capture a cropped image from the computer screen. Windows users must use the PrtScrn key (on my computer) or the PrtSc+Fn (function) as it is on some PCs. PrtScrn creates a picture of the whole screen that must be cropped to focus on the desired area -- sometimes something very small, like this: Vista/Windows 7 users - You have a nifty little accessory called the Snipping Tool hidden |
 in your Program files. Click on the Start Menu to find Accessories, then select Snipping Tool. A pop-up menu appears (shown to the right) offering you several methods of creating a screen shot from a very small area, up to the whole screen. Just click and drag to define the area to be "snipped." When you release the cursor, a pop-up menu asks you to choose the format in which to save your image. If you plan to use the image "as is," JPEG is probably your best choice. However, if you plan to edit the image by adding graphics, text, etc., it's better to save as a PNG. If the image is for a web page, be sure you save it in your site's images folder.
To save on download time (they can be very large files), these movies are quite short. For this reason, you may wish to replay or pause the movie -- easy to do with the controls that accompany every file. Look for this control bar at the bottom edge of the movie window.
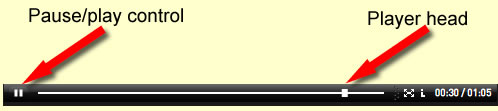
If you wish to review any portion of the movie, click on Pause, then drag the player head back and forth until you see what you'd like to view again. The player head can also be moved when the movie is not playing.
When you're ready, move on to Links.
| Introduction | Editing Text | Images | Links | Page Properties| Tables |